
How-to guide
Setting up the API key, getting through a reverse proxy, wiring the file browser and push notifications, and the connection errors people hit most.
Before you start: keep the Unraid API updated
U-Manager talks to the GraphQL API that ships with Unraid. Older API versions have bugs and missing fields that make parts of the app misbehave, and the U-Manager Companion plugin also needs a recent API to apply its patches correctly.
The easiest way to keep the API up to date is the official Unraid Connect plugin, which updates the Unraid API to the latest stable version for you:
- Open your Unraid WebGUI and go to the Apps tab (Community Apps).
- Search for Unraid Connect and install it.
- Once installed, it keeps your Unraid API updated to the latest stable release.
Creating an API key
To connect U-Manager to your Unraid server, you need to create an API key.
Steps
- Open your Unraid WebGUI in a browser
- Navigate to Settings → Management Access → API Keys
- Click Create API Key
-
Configure the key:
- API Key NAME: Enter a name to identify this key (e.g., “UManager”)
- Description: Optional description for reference
- Roles: Select admin (recommended)
- Click Create
- Copy the generated API key
Alternative: command line
You can also generate a key via SSH:
unraid-api apikey --createTroubleshooting
Important notice
U-Manager is a client application that consumes the Unraid API. If the API returns incorrect data or fails, the app will reflect that behavior. Issues caused by the Unraid API itself should be reported to Unraid.
First step (important): restart the API
In many cases, API key or connection issues are resolved by restarting the Unraid API service.
- Open your Unraid WebGUI
- Go to Settings → Management Access
- Find Unraid API Status
- Click RESTART API
- Wait for the API to restart
- Try using U-Manager again
If the problem is resolved after restarting the API, the issue was most likely related to the Unraid API and not the app itself.
Disks wake up when opening the app
This is a bug in the Unraid API itself, not in U-Manager. When the app
reads disk information, the official unraid-api runs a full
SMART read (smartctl --xall) on every disk without the
-n standby flag, which forces idle drives to spin up and
leave standby. The app only asked for disk identifiers, but the API
wakes the platters anyway.
It is being tracked upstream here: unraid/api#2018.
This is not an in-app setting. Until the fix reaches the official API, you can fix it on the server side today by installing the U-Manager Companion plugin, which patches your local Unraid API so disk reads no longer wake spun-down disks while the app is open. The companion reads disk identity from the system and only consults SMART for drives that are already spinning, matching what Unraid’s own web UI does.
To install it, follow the steps in Companion plugin (optional).
Known Unraid API issues
Before reporting a bug, check if your issue is a known problem with the Unraid API:
- Unraid API Issues: github.com/unraid/api/issues
Many issues that appear to be app problems are actually API bugs that need to be reported to Unraid directly.
Reporting U-Manager bugs
If after restarting the API the problem persists, and you’ve verified it’s not a known Unraid API issue, please open a bug report:
- Check existing issues first: github.com/jandrop/u-manager/issues
-
If your issue doesn’t exist, create a new one with:
- Description of the problem
- Steps to reproduce
- Your Unraid version
- Screenshots if applicable
Connection settings
Host
Enter your Unraid server’s IP address or hostname:
- Example:
http://192.168.1.100orhttps://192.168.1.100
Custom headers (reverse proxy)
If you access your Unraid server through a reverse proxy with authentication (like Cloudflare Access, Authelia, or Authentik), you may need to add custom headers to authenticate with the proxy.
When do you need custom headers?
- Cloudflare Access: Requires
CF-Access-Client-IdandCF-Access-Client-Secretheaders - Other reverse proxies: May require custom authentication headers
Adding custom headers
- On the login screen, tap Custom Headers to expand the section
-
Choose a header type:
- Cloudflare Client ID: Pre-fills the
CF-Access-Client-Idkey - Cloudflare Secret: Pre-fills the
CF-Access-Client-Secretkey - Custom: Enter any custom header key
- Cloudflare Client ID: Pre-fills the
- Enter the header value
- Tap Add to add the header
- Repeat for additional headers if needed
- Complete the login with your server URL and API key
Cloudflare Access setup
To use Cloudflare Access with U-Manager:
- In Cloudflare Zero Trust dashboard, go to Access → Service Auth
- Create a new Service Token
- Copy the Client ID and Client Secret
-
In U-Manager:
- Add a Cloudflare Client ID header with the Client ID value
- Add a Cloudflare Secret header with the Client Secret value
Troubleshooting
- 401 Unauthorized: Check that your header values are correct
- 403 Forbidden: Verify your service token has the correct permissions in Cloudflare
- Connection timeout: Ensure your reverse proxy is correctly forwarding requests to Unraid
File browser setup
U-Manager can browse files on your Unraid server using the
U-Manager Files plugin — a native file browser that
installs from Community Applications and runs on your server’s
port 8740, authenticated with your Unraid API key.
Install
In the Unraid WebGUI, open Plugins → Install Plugin and paste:
https://github.com/jandrop/u-manager-files-releases/releases/latest/download/UManagerFiles.plg
Click INSTALL. The plugin starts on port
8740 with /mnt/user as the exposed root.
Configure in the app
Open the File Browser settings in U-Manager and tap the
? in the top bar for the full setup guide. In short:
the host and port (8740) point at your server, and under
Authentication you paste an Unraid API key — it’s
recommended to create a new, dedicated key (Settings →
Management Access → API Keys → Create API Key) so you can
revoke just this access later.
Troubleshooting
- “File browser is not configured” — set it up in File Browser settings.
- Cannot connect — confirm the U-Manager Files plugin is installed and running on the server (port
8740).
Push notifications setup
U-Manager can deliver Unraid notifications to your phone using the U-Manager Notifications plugin.
Step 1: install the plugin in Unraid
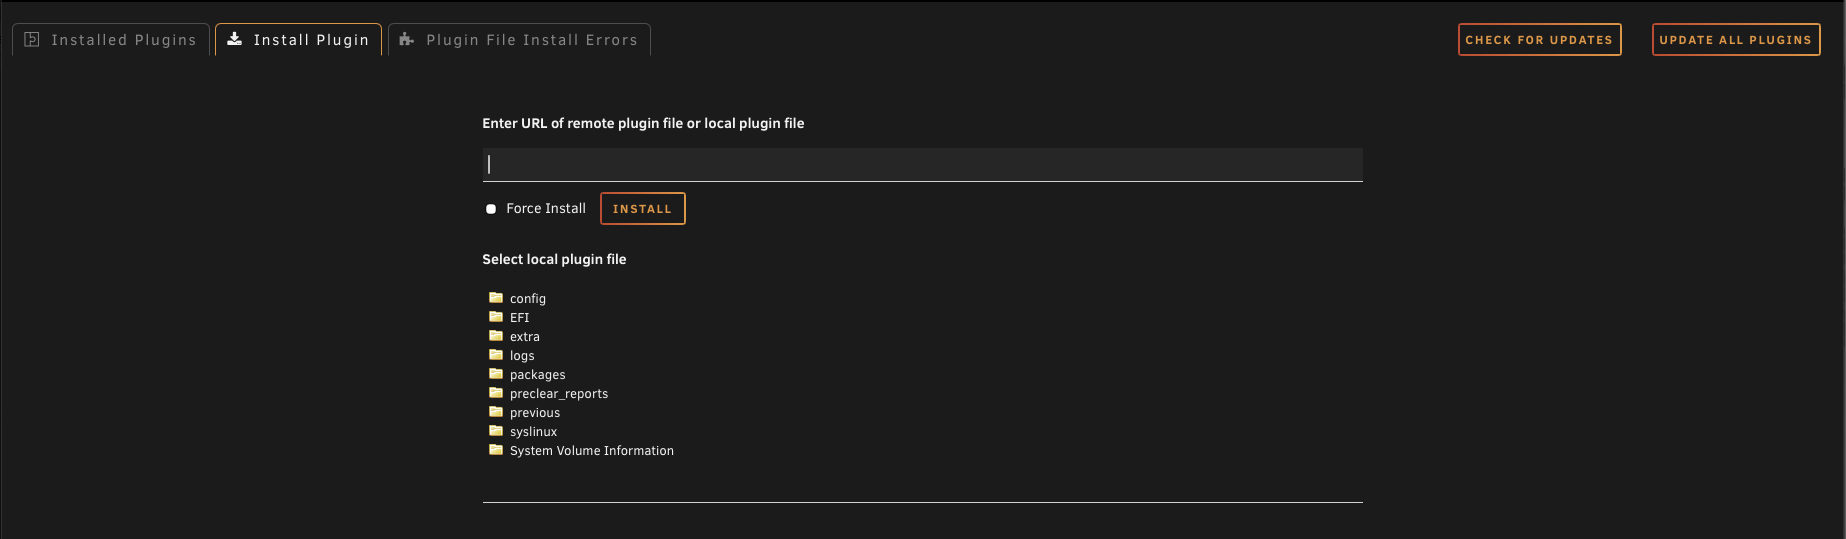
- Open your Unraid WebGUI and go to Plugins → Install Plugin.
-
In the field labelled “Enter URL of remote plugin file or local plugin file”, paste this URL:
https://raw.githubusercontent.com/jandrop/u-manager-unraid-plugin/main/UManager.plg - Click INSTALL and wait for the plugin to finish installing.
Step 2: get your push token in U-Manager
- Open U-Manager and go to Settings → Notifications.
- Enable the Push notifications toggle.
- Copy the token shown below the toggle.
Step 3: configure the plugin in Unraid
- In Unraid, go to Settings → Notification Settings.
-
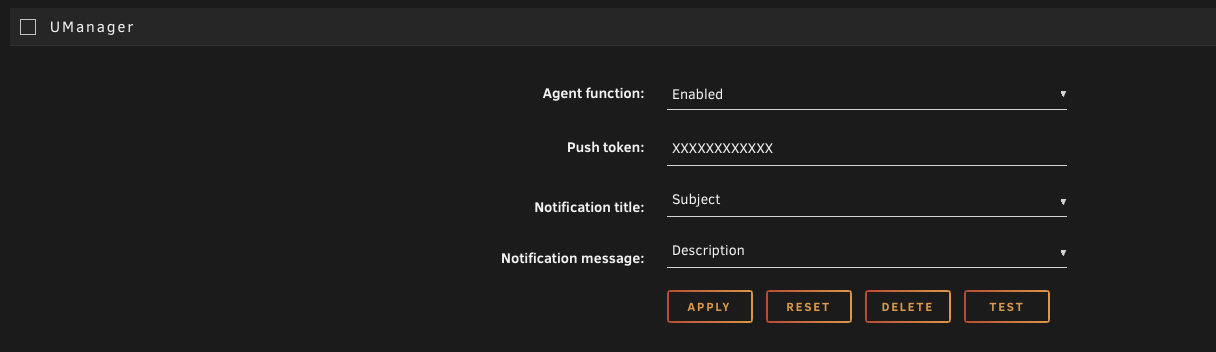
Scroll to the bottom — you will see a UManager section with these fields:
- Agent function: set to
Enabled. - Push token: paste the token you copied from U-Manager.
- Notification title: leave as
Subject. - Notification message: leave as
Description.
- Agent function: set to
- Click APPLY.
- Click TEST to send a test notification — it should arrive on your phone within a few seconds.
Important notes
- Token is regenerated when you toggle off and on. If you turn push notifications OFF in U-Manager and turn them back ON, a new token is issued and the old one stops working. You must paste the new token into the plugin again.
- Only one device at a time. A given token only delivers to one phone. If you set up the same token on a second phone, the first phone stops receiving notifications. To use a different phone, regenerate the token there and update the plugin with it.
Companion plugin (optional)
U-Manager talks to the official Unraid GraphQL API. A few features
depend on fixes that haven’t reached upstream yet — the
U-Manager Companion Unraid plugin patches your local
unraid-api so those features work today. Without the plugin
the app still works; the affected sections just stay dark or fall back
to safe defaults.
What it enables
- Parity check resume: lets you resume a paused parity check from the app. The official API doesn’t expose this.
- Disks stay spun down: works around an Unraid API bug (unraid/api#2018) that wakes idle disks whenever the app reads disk info. See Disks wake up when opening the app.
The other patches the companion installs are infrastructure for upcoming app features and don’t change anything visible today.
Install
- Open your Unraid WebGUI → Plugins → Install Plugin.
-
Paste this URL:
https://raw.githubusercontent.com/jandrop/u-manager-companion/main/UManagerCompanion.plg - Click INSTALL. The plugin re-applies its patches at every boot, so you only install it once.
Remove
In Unraid: Plugins → u-manager-companion → Remove. The patches stay live until the next reboot; after that, the pristine API bundle is loaded from squashfs.
Additional resources
Discord server
You can join this Discord server if you need more help: discord.gg/N7fxabZzXN